Categories
Programming

Just Scraping By: A Simple Introduction to Web Scraping using Scrapy

So often my posts end up being philosophical discussion on the whys and wherefores of code, so this week I’ve decided to share a bit of my knowledge for the person interested in getting into the wild world of building a web scraper using Scrapy (it’s easier than you think, I promise).

What Scraping provides

It wouldn’t truly be a post by me if I didn’t discuss the whys and wherefores a little bit, so if you’re already convinced and want to dive into the nitty gritty, feel free to skip ahead to the next section.

If you’re not quite convinced, let me extol the benefits and virtues a little bit. So, let’s say you have a plan or project idea that will be data driven, whether through data analysis, or some database driven application. However, being the unique and creative individual that you are, your idea is so unique that nobody has gone to the trouble of packaging up all that data into a convenient JSON/CSV/API for you to use at your leisure. Or the data that’s out there is stale, not in depth enough, or wrong. Well, if the data you want exists on a web page somewhere, then you’re in luck, web scraping can be your knight in shining armor.

But enough abstract blithering, lets use a real example from something I actually made. Let’s say you have the brilliant idea to make a website that will allow users to search, list, and track gym equipment that is for sale online, as well as its price fluctuations so you can predict if an annual sale is coming soon. Unfortunately, while the gym equipment companies all have convenient websites to purchase the equipment from, they do not provide you with a nicely formatted dataset file for you to peruse and manipulate. But no matter, you are a strong, independent developer who don’t need no premade datafile, because you can make your own with a web crawler.

Getting Started (finally)

So, let me walk you through the ‘how’. If you’re currently a student, you likely qualify for the GitHub Student Pack (or GSP if you’re hip), which I highly recommend given the massive amount of free goodies that you can get. I’ll be using two of those free goodies to walk you through how to build a web crawler, but everything in this guide can be done without the benefits, and I’ll note where the differences are.

So, the tools being used will be JetBrain’s Python IDE Pycharm, and the website ScrapingHub. If you have a GSP, you can get Pycharm Professional Edition for free, as well as access to a free Professional tier ScrapyCloud account on ScrapingHub. If you don’t have the pack, don’t despair, the free Community Edition of Pycharm and a free tier account will function just as well, and can handle your low to mid level projects.

If virtualenv, pip, and conda are like second nature to you, feel free to skip this paragraph, but if you’re new to Python and Python environments, then I recommend that you install PyCharm with Anaconda, in which the fine folks at JetBrains have bundled and automatically installed an Anaconda plugin, which will take away the hassle of needing to play in the command line trying to config your virtual Python environments, and instead jump straight into the intense coding action! Just make sure to click the ‘Install Miniconda’ option when you first open Pycharm while you’re setting your initial preferences. If you’re curious to know what Anaconda is, it’s simply a convenient combination of a virtual environment and package/dependency manager for your Python projects (think Docker + npm wrapped up into one convenient package).

Once you have Pycharm and Anaconda installed, you’re ready to get started. If you’re a seasoned Python veteran, feel free to use pip/virtualenv, but for the purposes of making this guide more accessible to newcomers, the guide will be using Conda.

(Actually) Getting Started

Step 1: From Humble Beginnings

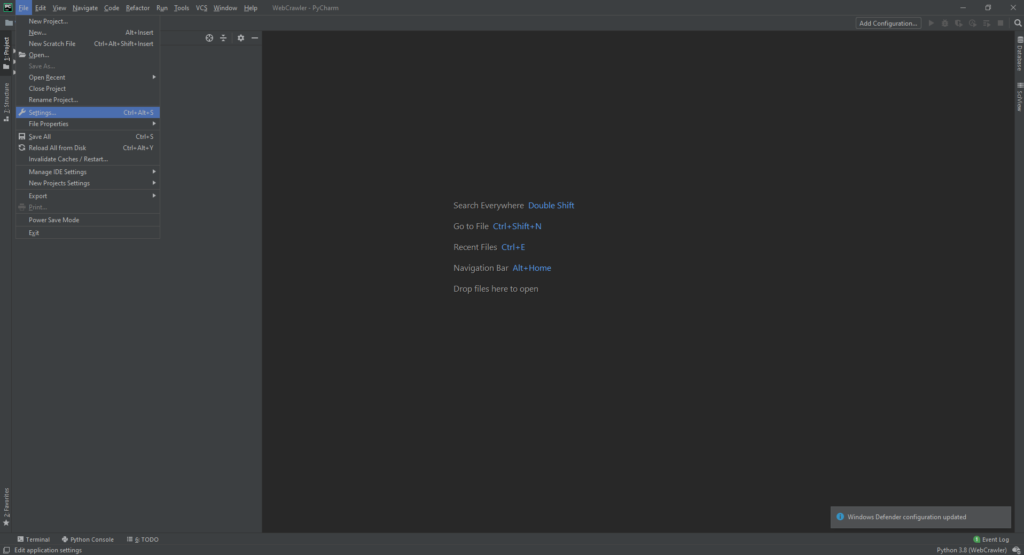
Ok, first step on our journey will be creating the project that will house your brilliant web crawler in Pycharm. When you open Pycharm (if it’s your first time, make sure to click the ‘install Miniconda’ option as you progress through the settings), you’ll be greeting with this friendly window.

Screenshot of the new/open project file window in pycharm
Don’t worry if the background is light, it just means you chose the light theme and that you have terrible taste and that you hate your eyeballs.

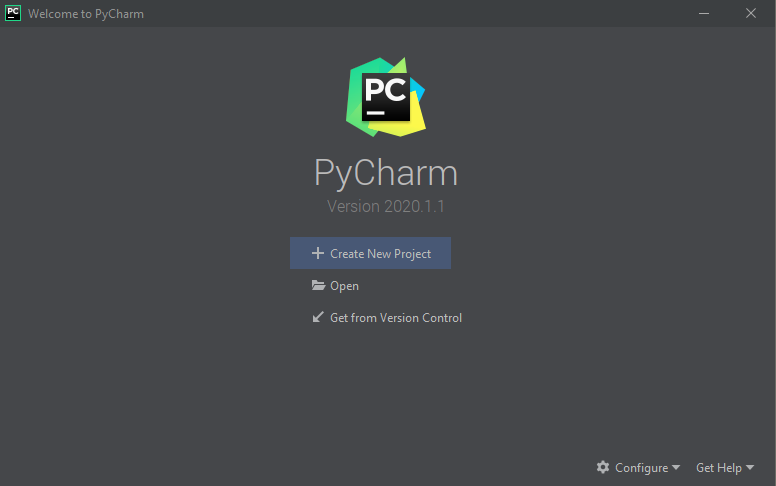
Click the Create New Project file to (obviously) create our new project. You should be greeted to this window:

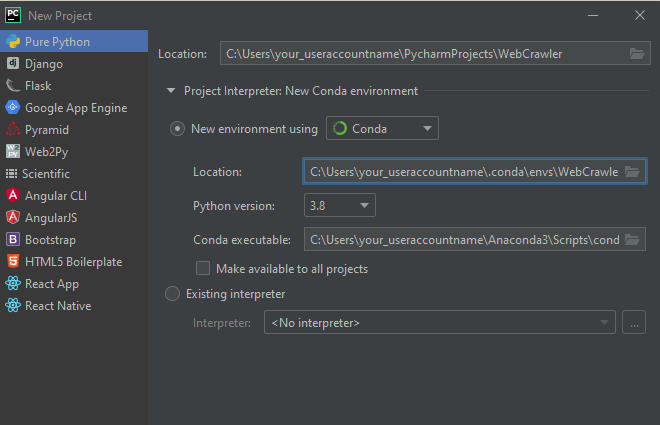
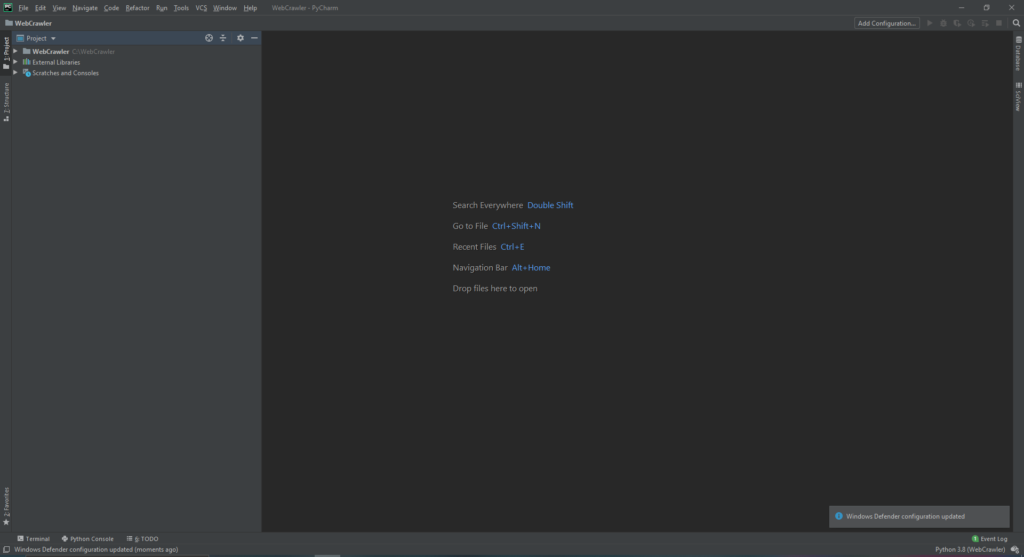
If it isn’t automatically selected, choose “Pure Python” from the dropdown on the left, and select “New environment” and select “Conda” from the dropdown. If you’ve installed the “Pycharm with Anaconda” package, it should automatically detect and set the location and conda executable automatically. You can change the location at the top to configure where you want the project file to be made. Assuming your conda configs are where they should be, you can just click create, and Pycharm will create your brand new Conda project for you, no command line needed.

Congrats on creating your (first?) Conda Python environment and project.

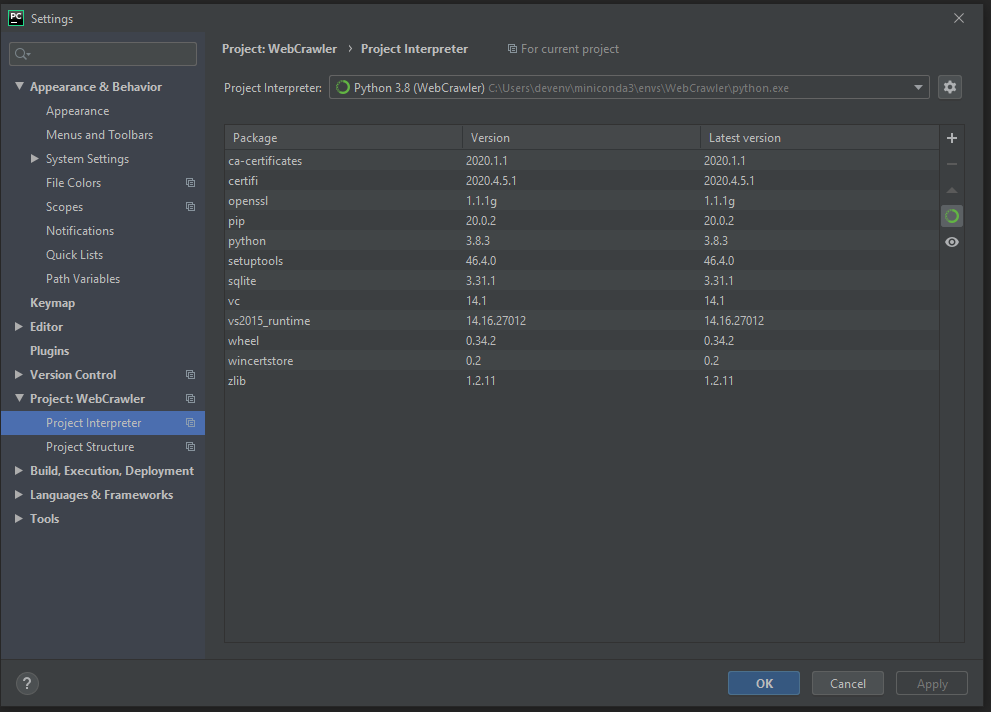
Step 2: Avoiding command-line dependency hell with the magic of JetBrains

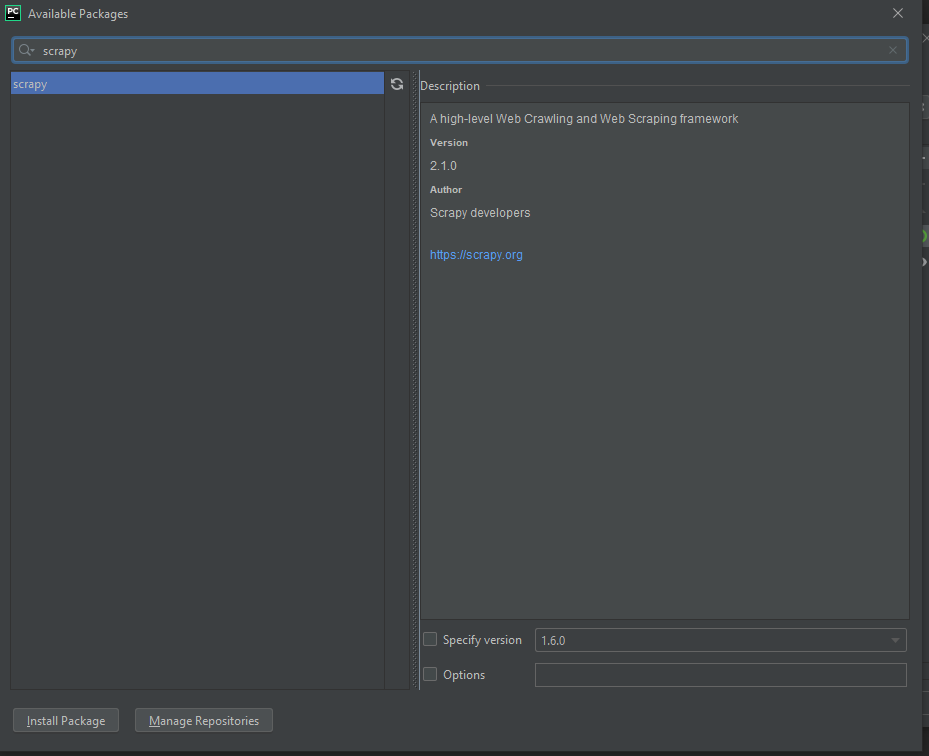
Now it’s time to install the dependency that will make all of your webcrawling dreams come true: Scrapy. If you’re new to python and you’re wondering “Wow, do all python libraries force the letters py into their names, even when it barely makes sense and makes the name really weird?” The answer is absolutely yes no, (if you criticize it they’ll take away your python license) it’s fun and quirky!

JetBrains has a built in package manager that lets you avoid the hassle of typing out the commands in the command line, so let’s use it, as the best programmers are inherently lazy individuals who use machines to do the work for them.

From the file dropdown, select Settings
From the settings window, select and expand ‘Project: whateveryounamedyourproject’, then select the nested ‘project interpreter’. If it looks something like this, you’re in the right place. Then, click the ‘+’ symbol in the upper right hand size of the page to add a new package
It will open a window where you will be able to search all the libraries in the available conda packages. Just search for ‘scrapy’ in the top search bar, and you should see a screen that looks like this. Then, just click install package in the bottom left, and you’ll be good to go!

Step 3: Create the Initial file structure

Now, while the title of this step may sound daunting, luckily scrapy provides us with a simple command line instruction to create the proper initial structure for a scrapy project.

First, click the tab labelled “Terminal” in the bottom of the window to open a terminal command line in your project’s home directory.
Next, in the terminal command line type in the scrapy command to create a new scrapy project 
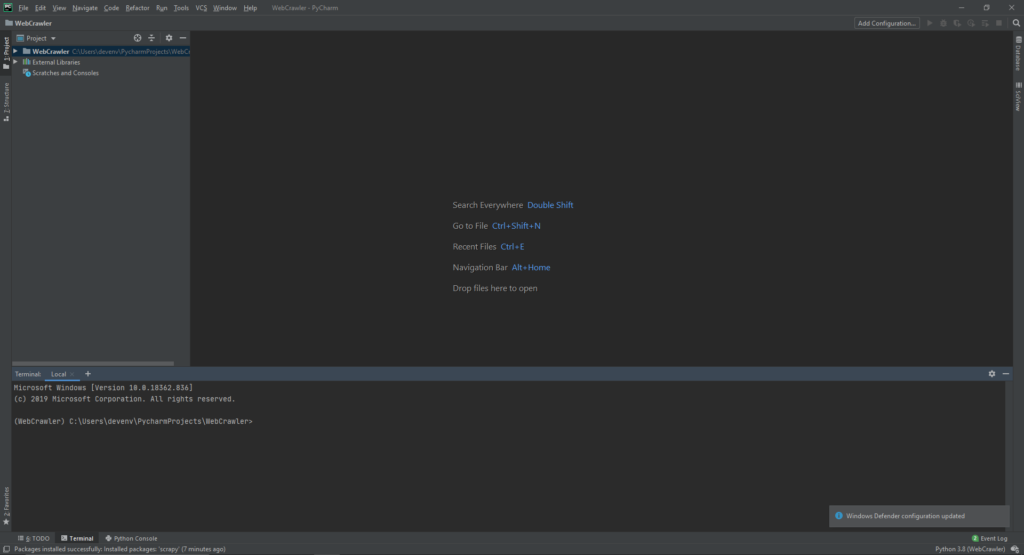
scrapy startproject yourcrawlername, where ‘yourcrawlername’ can be whatever name you want to make the project files be. Once you type in that command and hit enter, scrapy and python will automatically create the base folders and files needed in your directory for a scrapy webcrawler.
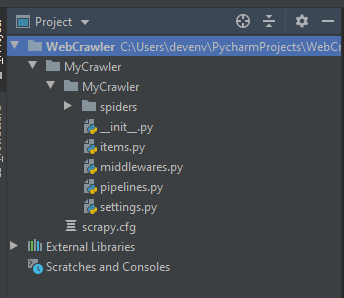
Now, if you un-nest the folders in the project view panel in the top left of the Pycharm window, you should now be able to see all the default files created by your scrapy command

Next Steps

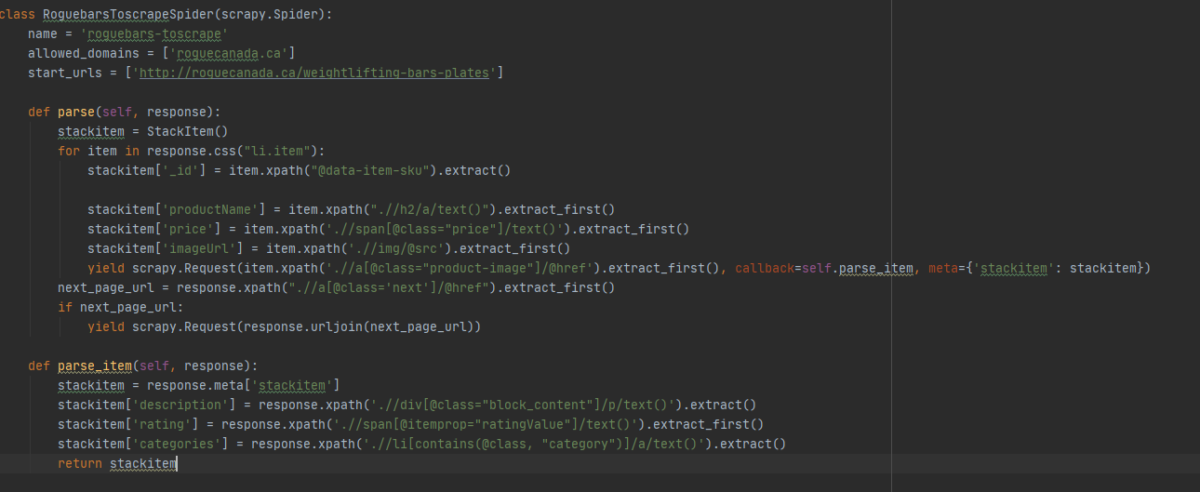
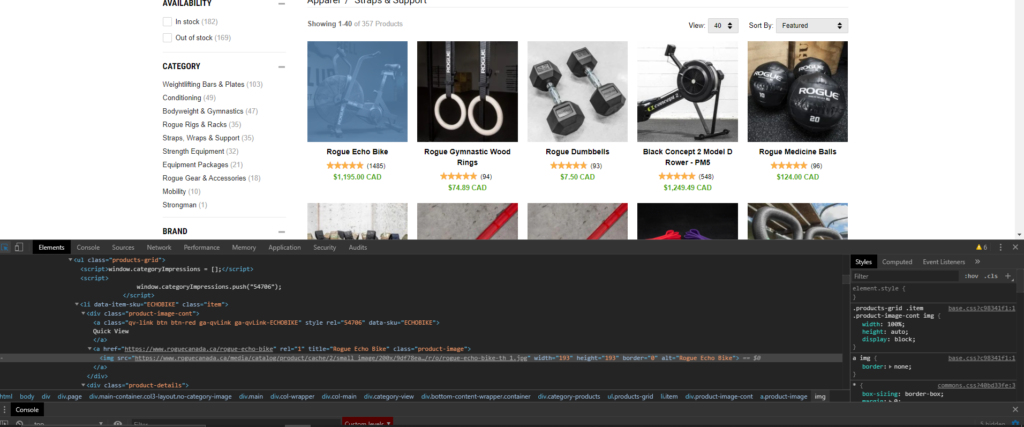
Next week we’ll get started on the actual coding of the web crawler, but until then if you want some homework to prepare, due to the inconsistent CSS styling and conventions seen across the internet, XPath selectors are going to become your bread and butter for actually selecting the data you’re interested in.

So if you’re feeling rusty/never knew XPath in the first place, give yourself a refresher/crash course on the selector syntax and then start using the devtools console in Chrome to start playing and testing your xpath selector skills. Because when it comes to webscraping, 70% of your time will be spent in a browser console figuring out the right XPath for what you’re scraping, 20% is wondering why your data is all mucked up, and 10% is the actual Python coding of the crawler.

Use the elements tab of the devtools to help determine the correct elements/classes/attributes/ids to select the data that you’re interested in scraping
And then use the console and a 
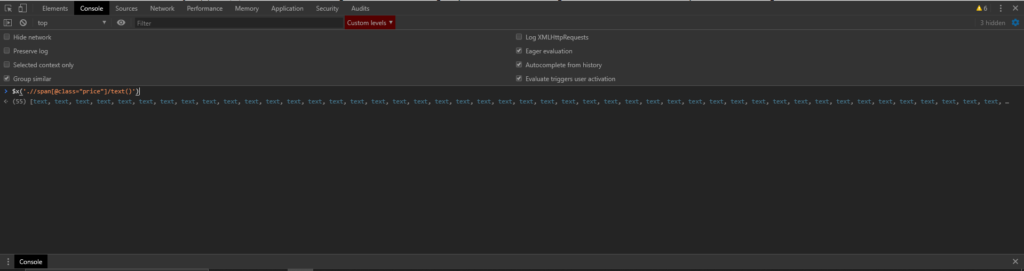
$x('yourXPathToTest')command to form and test your xpath queries in the console. This allows you to form, test, and fix your Xpath Queries with immediate feedback. Very useful.

Merely typing the XPath command will tell you the number/type of elements selected by the query, while hitting enter to input the command will allow you to check the value and exact properties of the result.

This concludes Part 1 of my introduction to Web Crawlers. Join me next week for Part 2, where I will give a brief introduction to Python for programmers in other languages (trust me, Python is easy and the only downside is that you become addicted to Python and you just want to always use it), we’ll go over writing your first webcrawler, running the crawler locally from your own computer, and then remotely on ScrapingHub’s servers.

If that doesn’t recon your fancy, then join me two weeks from now in Part 3, where I will show you the next steps to configure your webscraper to automatically upload its scraped results to your MongoDB server, and how to automate the running of your ScrapingHub spiders, to provide you with an automatically updated database of your scraped data. Pretty Neat stuff, eh?

Well, I hope you to see you Readers back next week for the next spine-tingling installment of my 3-part series on Scrapy, so in the words of the great Red Green: Keep your stick on the ice.

Categories
Programming

Failure is the surest path to Success

There’s an old joke that goes “What’s the difference between a junior programmer and a senior programmer?” and the punchline is “The junior programmer has to google the answer for everything, and a senior programmer just remembers the answer from the last time he googled it”.

I’ve found the fastest way to learn something (at least, personally speaking) is to just do it, and make a ton of terrible mistakes in the process and then solve them as you go. No amount of academic study and reading/watching of tutorials can serve someone as well as just rolling your sleeves up and jumping in, and getting stuck in on the code.

Just diving in headfirst has led me to find so many errors and learn intricacies that are never discussed when you just check documentation, or read through an overview. Stuff like the fact that vh and vw units in CSS are relative only to a portrait orientation on mobile. So when someone rotates your beautifully crafted page using vh and vw units into landscape, it turns into a nightmare hellscape of black bars and overlapping elements, OH THE HORROR! *Ahem* Sorry about that, just a little PTCSSD, a common malady of every programmer who is a back-end at heart, but has forced themselves to step outside of the mathematical world of APIs, algorithms, and big O into the effervescent and stylish world of front-end, to claim that coveted Full Stack status.

To get back on point, reading about mistakes to avoid never reinforces a lesson quite as well as actually making the mistake yourself, it’s the best way of learning. Note, while this advice is true, there are some cases where learning it firsthand is not the ideal. Such as learning what the Linux Command Line “sudo rm -rf /” command does. But true to my point, someone who runs that command and subsequently finds their entire hard drive deleted will likely never forget what that command does.

To expand on the words of Alexander Pope: To err is human, to forgive divine, and to spend 10 minutes sifting through 11 year old tangentially related stack exchange posts where the final post is the question asker writing “nvm I figured it out” without posting what the solution actually was is just the way of the continually learning programmer.

Categories
Programming

TensorFlow-Keras or: How I Learned to Stop Worrying and Love Linear Regression (Part 2)

Continuing off from last week’s post, I will be discussing how in working with TensorFlow and Keras I learned the real reason behind why Machine Learning is often referred to as Artificial Intelligence (beyond the fact that artificial intelligence sounds cooler). This is because oftentimes any sense of Intelligence that your models have is entirely Artificial, and the machine has merely tricked you into believing that it actually works, when in fact it a terrible model and you should feel bad for bringing it into existence.

As I mentioned last week, Machine Learning shows you the stupid intelligence of computers when left to their literal interpretations. Much like someone answering ’11’ if you asked ‘What do you get when you put 1 and 1 together?’, models can oftentimes draw conclusions that are correct on some deeper, literal level, but completely wrong in every other regard.

Case in point: when trying to create a model to predict the ticket risk for any particular geographic point within the geoboundaries of the data, my random sample point generator (by virtue of the spread out density of Los Angeles and their parking habits) would result in 90% of the risk output to be 0. This is a fact that I only truly came to understand the gravitas of later. At first, I was amazed that when I began training the model with the randomly sampled data, the accuracy % of the model quickly rose to around 85-90%, and roughly hovered around that percentage no matter how long I trained the model. But when it came time to actually use the model to make predictions, the results seemed to be skewed.

Eventually, I came to realize what was actually happening. By giving the model data where the correct output is 0 90% of the time, then the model learns very quickly how to be correct 90% by just always guessing 0. While obvious in retrospect, my error came down to attributing human logic and reasoning to the model, instead of realizing how primitive in nature machine learning still is.

Ultimately, I found that what makes or breaks a machine learning model has not so much to do with the model itself, but instead on the data you’re feeding it. If your data is too noisy or stochastic, you cannot create any reasonable models from it, at least at the current level of technological advancement in machine learning.

The most positive takeaway I can have from these trials and tribulations is that for all the fear of a ‘rogue AI’ in the current media and collective unconsciousness, humanity has little to fear for now, unless the key to humanity’s downfall is to just always guess 0.

Categories
Programming

TensorFlow-Keras or: How I Learned to Stop Worrying and Love Linear Regression (Part 1)

There’s an old joke about machine learning that goes: “If you walked into a job and just guessed a bunch of answers until you were right, you would get fired. But if you program a machine to do it, you get paid 6 figures as a ‘Machine Learning Analyst'”. The more I’ve tinkered with TensorFlow and Keras, the truer that joke has become.

My initial introduction to Machine Learning through TensorFlow and Keras quickly taught me three key things about Machine Learning. First, it’s mostly a test of how well you remember linear regression from your Statistics courses at University. Second, Machine learning programmers are guessing almost as much as their models most of the time, and third (which will be covered next week), machines are stupidly smart.

I found that the real key to being a master of Machine Learning lies not in your skill as a programmer (although it helps with the raw I/O handling of massive data dumps), but in your skill as a statistician and mathematician. The programming involved in actually making and training a model in Keras is relatively simple for any Python developer, but the real complexity and knowledge comes from your mathematical skill and knowledge to know why you should be adding a RELU activation layer, or for that matter what RELU even is, and why you’re using it. It’s fairly simple to follow and copy other’s machine learning code, but to actually understand the reasoning and functioning behind the processes is much more complex.

Of the next point, the amount of ‘playing by feel’ in machine learning was surprising. In trying to find an answer or a rule of thumb for the density and depth of layers to use when constructing a model, I found answers by PH.Ds in Machine Learning, individuals who are at the top of their scientific field answering the question with ‘try it with some random settings. If it doesn’t work, add more layers or remove layers, or add more channels and keep trying until it works better’. I guess much like how people say people’s dogs often look like their owners, it makes sense that machine learning scientists use so much guessing and adjusting based on results as their machine learning models use. I guess coming from a Neuroscience background where one research methodology for coronal function mapping in animals (in layman’s terms, what the different regions of the brain do) is to literally damage different parts of the brain with a scalpel, and observing what the animal can/can’t do to establish what that part of the brain does, but I was still surprised by the amount of guessing involved in machine learning.

This is all I have for this week, be sure to come back next week for the thrilling part 2 (and conclusion) to my thoughts and muses on machine learning.

Categories
Programming

Growing in-dependent

As I have been working on independent projects outside of the Web Development course curriculum, I’ve found myself moving away from the school mandated rigor of using only the inbuilt or personally developed functions, methods, and classes, and into the magical world of external libraries.

As you might be aware, JavaScript’s inbuilt Date class leaves much to be desired, even compared with *shudders* PHP. JavaScript’s Date class lacks methods to do what many other languages can, such as outputting a date in a specified format (such as YYYY-MM-DD), or the ability to capture the user’s current time and timezone, and then convert that time to a different timezone. In these cases, these were minor but required aspects of the project, but the code required to accomplish these requirements would take an inordinate amount of extra work for little return.

In these cases, external libraries come to the rescue. When I was searching for how to wrangle Date into behaving how I intended, I turned to every developer’s friend: StackOverflow. Whereby I found fellow developers inquiring the same question, and every top answer to these questions was the same: just use an external library. While there was variation between whether to use Moment.js or Luxon, they all established that trying to play ‘Don Quixote’ against the windmill that is JavaScript’s Date for complex methods is an exercise in futility, and one is better off simply using an external library and saving themselves the pain. Perhaps ES7 will bring changes to the inbuilt methods, but until then, external libraries can very often provide coverage for the deficits and shortcomings in the native language. While external libraries always introduce the risk of disrupting the environment and data architecture, once can take some of the effort that would have been used trying to tackle all this problems intuitively, and instead use a fraction of the effort into researching the various external libraries to ensure that they aren’t unwitting introducing problems.